Sunday 12 December 2010

N2CMS MVC and how to create a configurable MasterPage option

One of the most common questions on the N2CMS forums seems to be how to make it possible to be able to select a master page. In the past when I've worked on cms driven sites the templates have been relatively straightforward - the homepage has had a unique design whilst the others have had a set template. This was quite easy to do as I just created my own class which derived from the StartPage class and then created it's own HTML without using the main MasterPage. Simple, but effective.

However, recently I've been asked to convert an existing Sharepoint site to the MVC version of N2. This has been quite interesting to do and one of the areas I've had to work on is how to give the user the option of which master page template to use. I can't do this statically and because there are a number of templates on the current Sharepoint site it's possible that users may need to change page templates "on the fly".

I'm not going to go to deep in to the workings of this - it's probably easier to fire up N2 MVC and step through the code. I'm going to give you a step-by-step tutorial to get it working!

I'd like to thank the guys on this discussion on the N2CMS forum (n2cms.codeplex.com/discussions?size=2147483647) for providing the inspiration for this. I can't find the exact post however.

Step 1:
Make sure you download the latest v2.1rc MVC version of the site and make sure you copy the DLLs in the library folder into the bin folder of the N2CMS folder. If you don't do this with then you might get an error when you first try to start the site.

Step 2:


In the services folder, open the ThemedMasterViewEngine.cs file. In that there's a method which tries to determine which Master page to use based on theme or uses the  there's a class which checks to see what master page to use.


public class ThemedMasterViewEngine : WebFormViewEngine
{
        // You should change the "TwoColumnLayout.master" to be your default template
        string masterPageFile = "~/Views/Shared/TwoColumnLayout.master";

public override ViewEngineResult FindView(ControllerContext controllerContext, string viewName, string masterName, bool useCache)
{
if (!controllerContext.IsChildAction)
{
if (string.IsNullOrEmpty(masterName))
masterName = masterPageFile;

var root = Find.Closest<StartPage>(controllerContext.RouteData.CurrentPage()) ?? Find.ClosestStartPage;
if (root != null)
{
string theme = root.Theme;
if (!string.IsNullOrEmpty(theme))
{
string potentialMaster = string.Format("~/Views/Shared/{0}.master", theme);
if (base.FileExists(controllerContext, potentialMaster))
{
masterName = potentialMaster;
}
}
}
}

return base.FindView(controllerContext, viewName, masterName, useCache);
}
}

Step 3:

In the models/pages folder there's a ContentPageBase.cs class. We're going to change this to add an enum for the name of the page templates and add a property for any page which derives from the ContentPageBase (which is all of them) which allows you to select a template and puts it under the Advanced tab.

Open /Models/Pages/ContentPageBaseup and add this code:

        public enum PageTemplates
        {
            MyHomePage,
            TwoColumnLayout
        }

        [EditableEnum("Page layout", 60, typeof(PageTemplates), ContainerName = Tabs.Advanced)]
        public virtual PageTemplates PageLayout
        {
            get { return (PageTemplates)(GetDetail("PageLayout") ?? PageTemplates.TwoColumnLayout); }
            set
            {
                SetDetail("PageLayout", value, PageTemplates.TwoColumnLayout);
            }
        }

Step 4:

In the controllers folder, open up the TemplatesControllerBase.cs file. We're going to add some code in here which tries to get the name of the PageLayout from the page and sets the master page. Find the method below (be careful - there's a few overloads of it) and replace the method with this code:

protected override ViewResult View(string viewName, string masterName, object model)
{
CheckForPageRender(model);

            model = model ?? CurrentItem;
            if (model != null)
            {
                var item = model as N2.Templates.Mvc.Models.Pages.ContentPageBase;
                if (!string.IsNullOrEmpty(item.PageLayout.ToString()))
                {
                    masterName = item.PageLayout.ToString();
                }
            }

return base.View(viewName, masterName, model ?? CurrentItem);
}

Step 5:

I think this might be an oversight in the n2 release, but I've found I have to add this line into the web.config in the n2 editing folder:

<httpRuntime requestValidationMode="2.0" />

Otherwise I get an error when I try to change the page layout.

Step 6:

If you start up your site, and select "Edit" on any page you will find that under the "Advanced" tab you have a drop down list of layouts. If you change this you will be able to change the master page used on the site!

Friday 3 December 2010

New version of N2CMS released

I don't know if you've seen on http://n2cms.codeplex.com/releases but v2.1rc has been released. I'd strongly recommend anyone to sign up for the release notifications on Codeplex for the code as this way you will get the latest versions as soon as they come out. On the page for the releases if you look on the right you'll see the button to set notification settings.

As you know, I've been doing tutorials for the web forms version of N2. If you read my earlier posts you'll have read that for beginners I'd recommended the web forms version to get started with because of the better templates that came with it - it was simply easier/quicker to create pages and items. This looks like it has changed with the new release and I am currently investigating the new changes so that I'll be able to comment on the web forms vs MVC projects.

Another reason to download the new version is that it now ships with documentation! Now, I've read the documentation and it's still not perfect nor complete but it's far better than the array of wikis, pages and dead pages that are on the web. So, if nothing else you have a much better starting point for v2.1 than you did with the earlier versions.

All that said, I still aim to continue writing on this blog. There's some new features in the new version which look very interesting such as templates. This will allow you to create templates of pages and subpages with pre-populated content. Very useful.

I think however, my focus will broaden somewhat to include my experiences of the N2 MVC. I also am intrigued by how we can extend the editor with jQuery and similar technologies.

For now though, have a look at the new version!

Thursday 25 November 2010

Enhancing the editor

I realise I've not updated the blog for a while, so apologies for that. A mixture of work and other engagements has meant that I've not had the time to get some thoughts down for a while!

One area of N2 I've had to look at in recent months are the editor pages. At first glimpse it might seem that there's not a great deal you can do with them to specialise them seeing as they are to cater for the creating and editing of every single page type in your website. I've not needed to go into the guts of how the editor works as yet, but I've found a few things that might be of interest and certainly may help you get round a few tricky areas.

You will have to bear with me on this whilst I explain the background to the problem. On one recent project, I had a simple hierarchy similar to this:

Suppliers 

  • WH Smith (all our books cost £10 and our magazines £5)
  • News International (all our books cost £12 and our magazines £3)

Products

  • Books
    • Call of the wild
    • The Hobbit
    • Lord of the Rings
  • Magazines
    • FMH
    • Shoot
    • Radio Times
So each supplier has a set price list and when you create a book or a magazine you have to select a supplier and then display the "summary" of that supplier including the prices. In effect the problem we have then is to take something that is generic (the creator/editor) yet add code to handle specifics. I appreciate there is ways to do this, but I didn't really want (for time reasons primarily) to get my hands dirty in the source code of N2. 

The way I did this though was to use jQuery to make Ajax calls to a web handler (ASHX files).  I'd written which returned XML with details of the supplier. My jQuery code detected the type of page we're creating and then hooked in the calls to update the supplier summary if the supplier changed. When I get more time, I will try to package a simple example of this to demonstrate the principle. In effect it is just  a jQuery/Ajax solution but it certainly allows the N2 editor to potentially become even more responsive and powerful. Taken further, maybe we can add some jQuery features to the editor to check for the uniqueness of page titles, maybe even preview the page you're working as you type!

I am not saying this method is perfect at all, but in future it's certainly a technique  I'd definitely consider again.

Tuesday 14 September 2010

More room for the editor labels

This is just a quick tip for an N2CMS MVC site that I've found literally as I'm just making a few changes to a site I'm doing at the moment so it's short and sweet!


One of my clients says that when they are editing a page the descriptive labels next to the textboxes, checkboxes and dropdownlists are a bit "squashed" and I have to say I agree. There's very little space given for the labels before they roll onto the next line.


Just change the /N2/Resources/Css/Edit.css file where it says:-
body.framed .itemEditor .editorLabel { width:110px; float:left; clear:left; padding:5px 5px 0 0; margin:0 0 5px 0; }
to
body.framed .itemEditor .editorLabel { width:210px; float:left; clear:left; padding:5px 5px 0 0; margin:0 0 5px 0; }
Your labels are now twice as wide and it looks much neater. I think I will include this is all my future N2 sites.

Cheers!

Friday 3 September 2010

Hosting companies that work with N2CMS

I just thought I'd share this with you and it may be something I revisit a few times in the coming months. I've seen a few people asking on the forums about which web hosts work with N2CMS.

I have a few clients where they had an existing web site that is maintained by an external company and they want a CMS site which they can maintain themselves. Usually they are likely to be non-technical users in smaller companies. As a result of this, they are generally reluctant to move hosting companies for a variety of reasons such as the cost to terminate a contract and set up a new one, previous good service and also having to do other things like changing DNS records and migrating emails.

The problem I then have is that I don't get to specify which hosting company to use, it's given to me! Obviously, I know which ones will work from previous experience.


As a result of this, one of the first things I do is my "one hour" test. Basically if I can't download the code, deploy a "vanilla site", configure a few settings, create and edit a couple of pages within the hour I think that it will be problematic later on. I may well be able to fix all the issues if I had more time, but this is my rule of thumb. 


I have worked with three hosting providers and one intranet so far and here's my findings.


  • ukfast.co.uk
    I had a few issues with them that I couldn't resolve in my hour which I suspect may have been related to medium trust. Luckily the client was moving to a new hosting provider anyway so it didn't matter in the end, but if you're going to deploy an N2CMS site to ukfast, double check it first! They may have upgraded their hosting services since, but check first.
  • discountasp.net
    I have had no problems with these at all - the only slight "gotcha" I had was that I had to make sure IIS7 to work in "integrated mode" with the N2CMS MVC project, but I suspect this was because I upgraded from IIS6 to IIS7. I used a SQL Server database server on these projects and it all worked no problem. I'd also say that when I emailed support about non-N2 matters they were very helpful and prompt which gave me confidence.
  • FastHosts.co.uk
    I have had no problems with these at all - everything worked out of the box. The only slight issue I had (although I suspect it wasn't a FastHost issue as such) was that we had to get them to set IIS to work on ASP.NET v2 which is something I'd have expected out of the box. I suspect this could just have been because the server was a few years old, but again it's something to double check. I used a MySQL database server on two projects and had no problems at all. I had to email support a question about MySQL database and again this was answered promptly.
  • Intranet server running IIS6
    Just make sure that the ASPNET account can write to the upload directory or similar if you plan to allow users to upload documents or images but overall, n
    o problems here - deployed the site onto the server and it worked no problem :)

The databases work no problem and there's no difference from I (or the client!) can tell with regards to speed with either SQL Server or MySQL.

I am sure that some of these issues may well be specific to the projects I worked on - especially as the servers had been used on older sites, but if you experience a couple of problems then it's worth just double checking that the settings are correct. If you have problems with you current host then from my own personal experience as someone who's created and deployed working N2CMS sites onto live servers, these hosts will work for you too! :)

Thursday 2 September 2010

Resizing images on N2

One of the main issues you have with CMS systems is clients uploading images. Usually they take some pictures on their cameras and just want to upload the images without having to edit it in Photoshop or some other editing software.

The parameters

The parameters are pretty self explanatory, but let's run through them to make sure.Remember these are all done via the querystring e.g image.ashx?img=picture.jpg&w=100&h=75

  • img - this is the url of your image and can be a url from anywhere on the site
  • w - this is the width of the image.
  • h - This is the height of the image. 
You can pass in the width, height or both parameters. If you only specified either the width or the height though then the handler will automatically resize your image to the correct proportions.

Note if you're using an N2 image property that you may need to remove the ~ at the start of the url. Also, you will need to URLEncode this so that spaces etc are handled correctly. If you don't see the image appearing on your page or it appears as a broken link, it's most likely to be because the handler cannot load the image.

I have found this really helpful when automatically resizing an image depending on where it is dropped on a page. For example, if we had a standard two-column page with a small left hand column and a wider main column on the right, we'd want to size the image so that it wasn't too big - or small - for the column.

If we had a "Photograph" part, you could check which parent Zone it was in and then pass in different values to the image.ashx handler!

Sunday 29 August 2010

Tip: Configuration settings on your website

Just a little tip today, but one I've had to use on all the N2 work I've done.

For most sites I've had to do, I've had to add general configuration settings that can be access by any page. The current N2 site has these - if you right click/edit on your homepage and then click on the "Site" tab, you'll see a few there such as 404settings and the like.

I like to put all my config values in here as it's then all in the one place, but accessing them is a bit of a pain. If you try to access them by N2.Find.StartPage then the object returned is a ContentItem, not a StartPage.

To get round this, I create a static class and have a static method to return any property in the configuration settings:

public static StartPage SiteConfigurationSettings
{
        get
        {
                StartPage sp = N2.Find.StartPage as StartPage;
                if (sp == null) 
                {
                        throw new Exception("Cannot find the N2 Start page");
                }
                else
                {
                        return sp;
                }

        }
}

Now you can then access this property across the site in code as well as allow the end users to be able to update the value!

This is just a simple bare-bones example, but of course, you can cache this property too :)

Tuesday 24 August 2010

Creating a page with a drop down list selectable value

In the past I had to create a page for a client which contained a list of cars and one of the requirements was that they would want to create pages on the site to show the types of cars that they sell. This information included:-

  • The car body shapes (eg hatchback, estate, small van)
  • The year the car registration plate
  • The colour of the car
You get the idea. Now, we could of course allow free text to allow the user to enter this information and N2 will display this quite easily with <%=CurrentItem.CarBodyShape%> or similar. However, it's quite easy to make typing mistakes and it becomes harder to write a method later to return all red cars, or all cars registered in 2002 for example.

So, we decided that we would use drop down lists where possible so that data entry errors would be reduced. Simple? It should be straightforward, but first we need to look at how N2CMS properties work. If you look at a simple textfield:

        [EditableTextBox("Host Name", 72, ContainerName = MiscArea)]
        public virtual string HostName
        {
            get { return (string)(GetDetail("HostName") ?? string.Empty); }
            set { SetDetail("HostName", value); }
        }

You can see that "EditableTextBox" attribute tells N2CMS that when you want to edit or display this property it's a TextBox.We can change this easily to EditableFreeTextArea and get a text area.

However, for our drop down list it's not that straightforward. For my list, I want to add values in like red, blue, silver and black but how do we specify them? The answer is we create our own attribute first, then add it to our Item.

Load up Visual Studio and create a new class in your Items folder called CarShapeAttribute.cs like this:


I like to add "Attribute" to the end of my class names when I am creating attributes, but it's purely personal choice!

Ok, the next thing we're going to do is create the class. Copy and paste this code into your new CarShapeAttribute.cs class:-

#region Namespaces
using System;
using System.Data;
using System.Configuration;
using System.Linq;
using System.Web;
using System.Web.Security;
using System.Web.UI;
using System.Web.UI.HtmlControls;
using System.Web.UI.WebControls;
using System.Web.UI.WebControls.WebParts;
using N2;
#endregion

namespace MyProject.Items
{

    public class CarShapeAttribute : N2.Details.AbstractEditableAttribute
    {
        public override void UpdateEditor(ContentItem item, Control editor)
        {
            // Update the drop down list with the value from the ContentItem
            DropDownList ddl = editor as DropDownList;
            if (ddl != null)
            {
                ddl.SelectedValue = item[this.Name].ToString();
                if (ddl.Items.FindByValue(item[this.Name].ToString()) != null)
                {
                    ddl.Items.FindByValue(item[this.Name].ToString()).Selected = true;
                }
            }

        }
        public override bool UpdateItem(ContentItem item, Control editor)
        {            
            // Get the drop downlist in the editor control 
            // Maybe you can add a check that ddl is not null afterwards!
            DropDownList ddl = (DropDownList)editor;

            // Get the item ID from the drop downlist
            // NB this could just as easily be a string value
            // If it was a string you would do this instead
            // string itemID = ddl.SelectedValue; 
            int itemID = int.Parse(ddl.SelectedValue);

            // Set the value on the "bag" to save
            item[this.Name] = itemID;

            // Return true if the item changed (and needs to be saved)
            return true;
        }
        protected override Control AddEditor(Control container)
        {
            // Create your drop down list here and populate it with values - nothing fancy here!
            DropDownList ddl = new DropDownList();
            ddl.Items.Add(new ListItem("Not applicable", "0"));
            ddl.Items.Add(new ListItem("Hatchback", "1"));
            ddl.Items.Add(new ListItem("5 door", "2"));
            ddl.Items.Add(new ListItem("4 Door", "3"));
            ddl.Items.Add(new ListItem("Small van", "4"));
            ddl.Items.Add(new ListItem("Sports car", "5"));
            container.Controls.Add(ddl);
            return ddl;

        }
        public override Control AddTo(Control container)
        {
            return base.AddTo(container);
        }
    }
}

Next we need to create a Page and associated Item that we can edit.

On your Visual Studio PROJECT, right click and click on Add > New Item and you should be able to see you've got your N2 Page Template like this:-


I've called my page Car.aspx.

Once you've clicked ok, look in your "UI" folder and you'll see the template has created a Car.aspx page for you and in your Items folder you've got a CarPage.cs file! Great! That's saved us some boring config work!

Open up your Item/Car.cs file and paste this in:-

using N2;
using N2.Web;
using N2.Details;
using MyProject.Items;

namespace N2.Items
{
    /// <summary>
    /// This class represents the data transfer object that encapsulates 
    /// the information used by the template.
    /// </summary>
    [PageDefinition("CarPage", TemplateUrl = "~/UI/Car.aspx")]
    [WithEditableTitle, WithEditableName]
    public class CarPage : ContentItem
    {
        [EditableFreeTextArea("Text", 100)]
        public virtual string Text
        {
            get { return (string)(GetDetail("Text") ?? string.Empty); }
            set { SetDetail("Text", value, string.Empty); }
        }

        // This is our car shape attribute!
        [CarShapeAttribute(Title = "Car shape", SortOrder = 110)]
        public virtual int CarShape
        {
            get { return (int)(GetDetail("CarShape", 0)); }
            set { SetDetail("CarShape", value, 0); }
        }

    }
}

And in your UI/CarPage.aspx page, paste this in:

<%@ Page Language="C#" AutoEventWireup="true" CodeBehind="Car.aspx.cs" Inherits="N2.UI.Car" %>

<!DOCTYPE html PUBLIC "-//W3C//DTD XHTML 1.0 Transitional//EN" "http://www.w3.org/TR/xhtml1/DTD/xhtml1-transitional.dtd">

<html xmlns="http://www.w3.org/1999/xhtml" >
<head runat="server">
    <title>Car</title>
</head>
<body>
    <form id="form1" runat="server">
    <div>
<n2:Display PropertyName="Text" runat="server" />
<p>The car shape selected is:</p>
<p><b><%=CurrentItem.CarShape %></b></p>
    </div>
    </form>
</body>
</html>

Now save it all, check it compiles and hit Control and F5 to run it. When it loads up, right click on the root page and select "new" and you should see the option to create a new CarPage!

Great! Click on it and you'll now see your page where you can enter a title and select a drop down list of the car shape:


Save this and your page will be displayed:

The car shape is 5?! WHAT!! Well, it is in N2CMS as we're storing it as an integer! 

The good news is that the display value of the car can change - we're not storing the "Sports car" value, but the ID so you can easily change this and also add new values. 

To display the correct "friendly name", we'll need to add a property onto our Items/Car.cs class. So now paste this into your class:

using N2;
using N2.Web;
using N2.Details;
using MyProject.Items;
using System.Web.UI;
using System.Web.UI.WebControls;

namespace N2.Items
{
    /// <summary>
    /// This class represents the data transfer object that encapsulates 
    /// the information used by the template.
    /// </summary>
    [PageDefinition("CarPage", TemplateUrl = "~/UI/Car.aspx")]
    [WithEditableTitle, WithEditableName]
    public class CarPage : ContentItem
    {
        [EditableFreeTextArea("Text", 100)]
        public virtual string Text
        {
            get { return (string)(GetDetail("Text") ?? string.Empty); }
            set { SetDetail("Text", value, string.Empty); }
        }

        // This is our car shape attribute!
        [CarShapeAttribute(Title = "Car shape", SortOrder = 110)]
        public virtual int CarShape
        {
            get { return (int)(GetDetail("CarShape", 0)); }
            set { SetDetail("CarShape", value, 0); }
        }

        /// <summary>
        /// This method takes in the id of a car shape and returns its friendly name
        /// </summary>
        /// <param name="id">The c</param>
        /// <returns></returns>
        public string CarShapeText
        {
            get
            {
                // Create an instance of the attribute class
                CarShapeAttribute attr = new CarShapeAttribute();
                
                // Pass in a temporary control to get back our drop down list
                Control c = new Control();
                DropDownList list = (DropDownList)attr.AddTo(c);
                if (list == null)
                {
                    return "Not found!";
                }

                // Return the value!
                return list.Items.FindByValue(CarShape.ToString()).Text;
            }
        }

    }
}

Now, when you compile and then reload your page you should see this:


You can see the principle here of how we can now go on to create other attributes for other parts of the car. You may also want to create an "attributes" folder to put all your attribute classes in so it doesn't get too cluttered.

What is now VERY powerful is that we can do search for cars by this attribute type to create search pages - I'll cover this at a later date though!

Simple! Hope this helps!

Wednesday 18 August 2010

Using N2CMS with MySQL

As I have mentioned before in an earlier blog, when I am developing locally I like to use SQL Server 2008 primarily as it's the one I have most experience with. However, some of my clients can only use MySql.

To complicate matters further, I've recently had an order come through to build a site which will have to use the ASP.NET membership with MySql which is something I've not done before.

I'd recommend reading these blog posts first:

Both were a big help in explaining what to do. 

However, I had to do a few tweaks first to get it working. Nothing too difficult but again it's the kind of thing which can eat time. So, if you want to get your N2CMS site working with ASP.NET Membership and MySql, here's my two minute guide:-

  • Add a reference to the MySql.Web.Dll which you will find in "c:\Program Files\MySql\MySql Connector Net 6.2.3\Assemblies"
  • Change the N2CMS connectionstring to point to your MySql database (for this example I am just going to leave the of the connection string as "N2CMS" which is the default one)
  • Replace your membership, roles and profiles nodes in the web.config with this:-


    <membership defaultProvider="MySqlMembershipProvider">
      <providers>
        <clear/>
        <add name="MySqlMembershipProvider"
        type="MySql.Web.Security.MySQLMembershipProvider, MySql.Web, Version=6.2.3.0, Culture=neutral, PublicKeyToken=c5687fc88969c44d"
        connectionStringName="N2CMS"
        enablePasswordRetrieval="false"
        enablePasswordReset="true"
        requiresQuestionAndAnswer="false"
        requiresUniqueEmail="true"
        passwordFormat="Hashed"
        maxInvalidPasswordAttempts="5"
        minRequiredPasswordLength="6"
        minRequiredNonalphanumericCharacters="0"
        passwordAttemptWindow="10"

        applicationName="/"
        autogenerateschema="true"/>
      </providers>
    </membership>

    <roleManager enabled="true" defaultProvider="MySqlRoleProvider">
      <providers>
        <clear />
        <add connectionStringName="N2CMS"
        applicationName="/"
        name="MySqlRoleProvider"
        type="MySql.Web.Security.MySQLRoleProvider, MySql.Web, Version=6.2.3.0, Culture=neutral, PublicKeyToken=c5687fc88969c44d"
        autogenerateschema="true"/>
      </providers>
    </roleManager>

    <profile defaultProvider="MySqlProfileProvider">
      <providers>
        <clear/>
        <add
        type="MySql.Web.Profile.MySqlProfileProvider, MySql.Web, Version=6.2.3.0, Culture=neutral, PublicKeyToken=c5687fc88969c44d"
        name="MySqlProfileProvider"
        applicationName="/"
        connectionStringName="N2CMS"
        autogenerateschema="true"/>
      </providers>
    </profile>

If you are wondering how I got the version and PublicKeyToken, right click on the MySql.Web.dll in the solution explorer and click properties - this will give you the version. To get the PublicKeyToken, you will need to look in the c:\windows\microsoft.net\framework\v2.0.xxx\config\machine.config file and search for "MySql".
If you now run N2 you will get the installer and be able to install a new site! Note you can also manage the providers, members, roles etc from within Visual Studio with the ASP.NET Configuration tool. 

Once you've done this you may need to alter the rules on passwords etc, but that is beyond this two minute guide!

Hope this helps!

Tuesday 17 August 2010

How to reorder pages in N2CMS

This is just a little tip, but one which I missed.

If you want to move pages up and down through the N2CMS hierarchy, there's two small buttons at the top left of the page which can do this for you. Select your page, then click on one of these and your page will move!


Run several N2CMS websites on one database server

One of the things that I have found is that out of the box, N2CMS will create your tables as:-
  • n2item
  • n2ContentItem etc.
Now, for some smaller clients of ours they can't afford to have a dedicated database server. On some of the cheaper hosts you can one database but then you'd need to create separate n2cms tables for each client.

It's dead simple to do this. If you had ClientA and ClientB you would want your tables to be something like:
  • ClientA_Item
  • ClientA_ContentItem and 
  • ClientB_Item
  • ClientB_ContentItem
To do this, look in your web.config and there's an element that you need to ammend

<!-- Other flavours: SqlServer2005, SqlServer2000, MySql, SqLite, SqlCe, Firebird -->
<database connectionStringName="N2CMS" flavour="AutoDetect" caching="true" cacheProviderClass="NHibernate.Caches.SysCache2.SysCacheProvider, NHibernate.Caches.SysCache2" tablePrefix="TheNameOfYourClient_">
<hibernateProperties>
<add name="hbm2ddl.keywords" value="none" />
</hibernateProperties>
</database>

Voila! You can now run several sites on one database!

Note: I always add a "_" after the name of the client as it makes the tables in the database look a little neater!

Data import and moving databases

When I am developing, I have a local setup which consists of a laptop to do the development work on and a separate database server. I prefer to develop with SQL server for a number of reasons, primarily it's the one I've got most exposure to and I know it more than any other database.

However, some of my clients are using MySQL database so at first it may seem that there's some data migration that would need to be done to move the data from SQL Server to MySQL.

Before I knew about this little "trick", I'd spent money on software to convert the databases (and most didn't quite work either) but there's a couple of reasons that I now realise why I don't need to have done this.

Firstly, when n2cms is saving data to the database it uses NHiberate to do it. This is great news as it hides the database implementation - I call save on an object and under the n2cms hood it calls NHibernate to save the object to the database. Luckily, to change databases it's a simple change in the web.config and it also allows us to use other database providers such as SQL Server, SQL Lite or MySql.

Secondly, n2cms allows you to export your data from one n2cms website so you can import it into another. This is completely database agnostic as well!

This is something I missed at first, but if you look at the top of the screen you'll see an "Export" button.


Click this and you'll now get the option to import or export data. Export your data and save it somewhere on your disk.


If you are exporting your site to move to another server, just click "Export these items".

Ok, so we've exported the data to our local disk and we now need to to migrate the data to the new server.

Go back into your web.config and change the connection string to your new database server.Start up your n2cms site and you will get the install page.

Install as usual until step 4 and select the "Advanced options" at the bottom of the page.

Select your exported file and n2 will then recreate your site on the new server!

Simple, but absolute genius!

How to set up your N2CMS and Web Forms development environment

One of the areas I found a little tricky at first was to set up N2CMS so I could actually run it. I wasn't quite sure where to start, what batch files to run etc. This guide will help you download the N2CMS Web Forms Template software, set up Visual Studio with the snippets and get you running N2CMS with a SQLLite database.

This guide is purely to get you started. It's not going to get into any details, just a step by step guide to getting you ready to be able to follow some of my other guides later on.


Also, I am assuming you will be using Visual Studio 2008 as currently I believe there is issues with Visual Studio 2010.

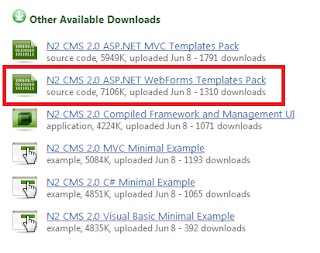
First of all, go to www.n2cms.com and then go to the downloads page and download the "N2 CMS 2.0 ASP.NET WebForms Templates Pack" as highlighted here:-


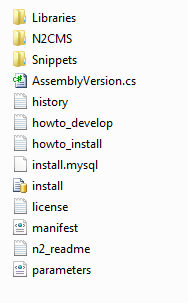
Next, extract the archive out. I am going to extract this archive into my "d:\n2cms" folder. From now on, I will assume you will have done the same. You should now see something like this in your d:\n2cms folder:-


Because we're going to run this demo using SQL Lite, you will need to copy the two files in the "Libraries" folder into the N2CMS/bin folder. If it asks about copy and replacing, just click ok. If you don't do this, you will get an error when you try to run the site at the end of this guide!

Now, the next stage is to set up Visual Studio 2008 so that we can use the properties and page template options. I have found these invaluable when developing N2CMS sites and I'd strongly suggest you use them. To be honest, although setting up the properties isn't easy there's a couple of "gotchas" which are simple to miss. If you use these, it's just far, far easier to develop.

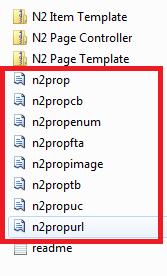
Ok, if you look inside the "Snippets" folder you'll see a few files that start with "n2" like


Copy these files into your "\Documents\Visual Studio 2008\Code Snippets\Visual C#\My Code Snippets" folder on your C: drive. When you develop a page in N2CMS, you'll be able to type "n2prop" then press tab and the code will be generated for you.

The next thing is to set up the page and item templates. In the "Snippets" folder there are two zip files that you need to copy to your "\Documents\Visual Studio 2008\Templates\ItemTemplates\Visual C#" folder:-


You can ignore the  "N2 Page Controllers" snippet as that is for the ASP.NET MVC project.

Right, now we've done the background work, go do d:\n2cms\n2cms and double click on the N2.Templates.sln file. Or you can open this from within Visual Studio 2008.


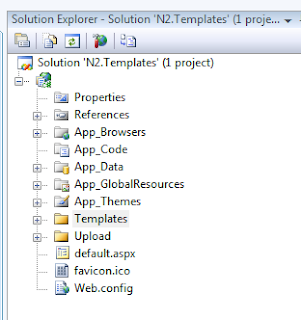
Once it's loaded you should see something like this now in your Solution Explorer:-


If you now press "Control and F5" together to run N2, you should then be able to see the N2 homepage!


Note: If you get an error saying "The IDbCommand and IDbConnection implementation in the assembly System.Data.SQLite could not be found." then you've forgotten to copy the MySQL files from the library folder. I nearly always do this when I start a new project!

Wednesday 11 August 2010

Welcome

Welcome to my new blog which is aiming to provide some clear instructions for those developers who are looking to develop with the superb N2CMS platform.

One of the complaints about N2CMS is that there's a lack of clear documentation and also that the instructions and tutorials aren't clear. I'll be honest and say that over the last year that I've been using it, I've found a few hurdles in the way but once you've mastered them you'll see just how easy it is to make pretty impressive content managed websites. I'm going to try where possible to use screenshots from Visual Studio, real code samples and not really delve too much into the "under the hood" code. The aim will be clear examples wherever possible to help solve "real world" problems that I've found.

I'm going to try to dump everything I've picked up in the last year into this blog. I daresay some of it you'll know, some of it might not be 100% correct but I hope there's a few tips that you will be able to pick up on and find useful.

Cheers!

I'm going to assume that readers will at least know some ASP.NET and C# and have Visual Studio 2008.